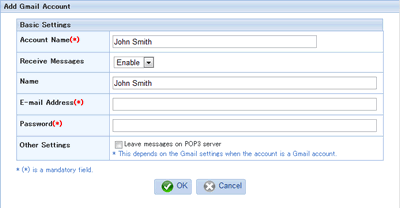
Click [Mail Account] in [New Account]
General

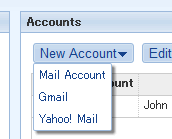
Enter the following information.
[Account Name]
Enter the name of the account and choose whether you receive messages with this account.
*This is a mandatory field.
[Name]
Enter your name.
[E-mail Address]
Enter the E-mail address. The address you entered in this field will be appeared as "Name<E-mail Address>" in "From" field of new messages.
*This is a mandatory field.
Incoming Server (POP3)
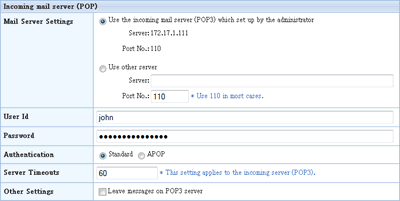
Choose one from the following option.
* POP3 is a protocol for receiving messages.
[User ID]
This is a mandatory field because it is required to receive messages.
[Password]
This is a mandatory field because it is required to receive messages.
[Authentication]
If the mail server is configured normally, choose "Standard".
If the mail server is configured normally, choose "Standard". If you choose "APOP", the password is encrypted for the login
[Server Timeouts]
Specify timeouts when login to the server.
[Other Settings]
If you check "Leave Messages on POP3 Server" option, messages are not deleted on the mail server.
If you wish to receive the messages on the other mail client, use this option.
* If you check "Leave Messages on POP3 Server" option, all the messages in the mail server are received. The messages already received also received again.
Outgoing Server (SMTP)
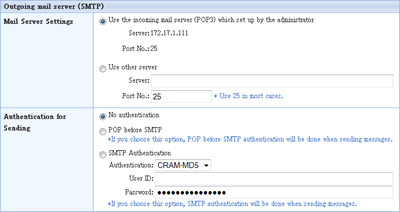
Choose one from the following option.
Specify your outgoing mail server.
[Authentication for Sending]
If you choose "Use other server", choose the authentication.
If you choose [SMTP Authentication], specify [Authentication Method] (CRAM-MD5, LOGIN, PLAIN).
-
No authentication
-
POP before SMTP
-
SMTP Authentication
[SMTP Authentication Settings]
If you choose "SMTP Authentication" for [Authentication for Sending], specify these fields. If you do not specify anything, the authentication will be done by the User ID and Password you set up for the incoming server.

